Sunday, August 30, 2009
I've Gone to Bed, Really, Haven't I? I'm Not Sitting Here Blogging. Not Really.
I've been so busy lately I haven't really had time to post anything --
But here's what I've been doing:
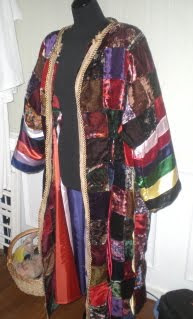
This is a work in progress. It's Joseph's coat in our local theater's production of "Joseph and the Technicolor Dreamcoat."
Little did I realise what a nightmare this would be when I agreed to do it.
First off, the fabric had to be chosen, and the place to get it was almost 2 hours away -- so I called finally and had it mailed to me. Then it was another trip to get the satin. All my life I've lived in moderate to big cities -- Indianapolis, Cincinnati, Mission Viejo (the southern end of Orange County, CA) -- and then I moved to Middle-of-Nowhere, NC and I have nothing. Seriously -- we have a Wal-Mart and a Lowe's hardware, and about 3 grocery stores. That's it.
So I really need a good reason to drive to Raleigh, NC, which is about an hour and a half south. I try to combine several trips into one -- doctor's appointment with shopping, etc. So the satin had to wait until I had to be in Raleigh for something else. This further delayed the project.
Plus, I am a supreme procrastinator with a lot of excuses.
This coat has ten different pleats inside cut in triangle shapes. They are made so that when the actor wears it, it looks like just your regular coat. But then when the brothers grab the edges, it turns into this circular skirted thing.
Well, right there you have it -- I've spent the last week trying to figure out diameter times pi minus circumference around bottom of coat divided by ten. Believe it or not, my high school geometry class actually came in useful here. My brain, however, is completely fried.
This was after I adapted a pattern from a bathrobe to do the thing. This afternoon after looking at it, I decided to leave off the little nehru collar that I originally was going to put on -- and then I decided to use all that roped cording I got at the Durham Scrap Exchange.
Definitely a work in progress.
I just spent the last 2 hours sewing in the pleats and then ripping out the tops and pinning them down. I need to press them all closed and start on the lining (same process), and then put the sleeves on, then sew the lining and those pleats together, and THEN I should be close to finished. The first real dress rehearsal is tomorrow. It's now 3:42AM and I'm having trouble keeping my eyes open.
So that said, here I am blogging (procrastinating again), after listening to a few lectures on www.ted.com, all about design. If you're going to have to be trapped in the same room as a nightmare project, you might just as well learn something.
So I think I'm giving up and going to bed. Tomorrow is another day.
xoxox
Wednesday, August 19, 2009
Kitchen Meets Sewing Room
The waste/pulp bin was about 3/4 full, and looked altogether too juicy to me. My solution? Find something to drain the juice out. I don't have cheesecloth readily available, and most of my dishtowels are terrycloth, so I went in search of something I could use.
I walked into the sewing room and spied netting that I have to put in a skirt for Barbie (dang! Still have to finish that!) Anyway -- I immediately thought 'netting! That will do the trick!"
I had some actual crinoline leftover from my days of making bridal gowns. So I cut a big square, dumped the pulp into it, and left it to drain for awhile.
I got another full cup of juice out, no kidding! In the end, I squeezed as much as I could out.
So if you're lacking something in the kitchen, try looking in your sewing stash. You just never know.
xoxox
Thursday, August 13, 2009
Training the Eye
Unfortunately, after I tried it on, I thought it was a bad choice for me. I looked -- well, dumpy.
Upon closer inspection, I realised why I looked this way. The box pleats were stitched down about 5" below the waistband. Since the waistband sits below the waist and more toward the hip, this created a long sillhouette that flared out at just the wrong spot. I think this would have been the case no matter how short or tall, skinny or fat, young or old one was -- this was probably the reason the skirt was at Goodwill!
But there was an easy fix to this problem. I simply took out the stitching, and released the pleats up to the waistband. I sat and did it just now; it took about 20 minutes.
Voila! Cute skirt!
I've noticed lately a LOT of princess-seamed sheath dresses in the thrift stores. These just look dated -- until you put a ribbon at the empire waist, or a wide belt just above the waist. Try it -- it's amazing how an older, dated piece becomes new and fresh again!
If a piece of clothing you own fits great but just doesn't look right, take the time to really study the mirror. There may be something easy you can do to adjust it and turn it into something adorable.
Let me know if you do!
xoxox
Tuesday, August 11, 2009
A Practial Addendum to All Nighter
On the matter of draping -- or, the way a dress or skirt's fabric should hang --
I did a narrow "shirttail hem" on the dress because it was already the length she liked.
However, most of the time, you need some weight at the hemline to make the dress drape/hang as it should. Also most of the time, a wider hem (like 2-3 inches) is enough fabric weight to do that.
You can tell when a dress or skirt hasn't been hemmed properly, because it won't hang right. It looks cheap, or homemade. Usually the fix for that is simply to make the hem wider. If you don't have enough fabric to do that, you can use packaged bias tape from the fabric store.
Since these particular skirt pieces in Babydoll's dress were cut with the edges/seams having a bias (diagonal) drape, it was important to have that fabric weight at the hem to make it drape right. If it didn't have some weight, the sides would stick out and it would just look silly.
Brief aside for the newer sewers --
Let me explain the edges having a diagonal drape -- it's like the skirt pieces were triangles, with the point at the waistline. So when you laid them out on the fabric, the big arrow on the pattern pieces said to lay them from the point of the triangle to the center of the bottom line of the triangle.
That's a really basic explanation -- but you can see in your head how the sides of the triangle would angle against the grainline of the fabric.
So, to create more weight within the narrow hem, I double-stitched the hemline. I stitched the folded edge of the hem on the inside, and stitched again on the edge of the bottom of the hem. This stiffened the hem just a little, and the thread used also added some weight.
Both these things adjusted the weight of the hem to make the dress drape just right. No side seams sticking out -- hooray!
On making it look professional, or store-bought --
I did something stupid, and I should have known better.
First off, when you put in the zipper in the back, use an invisible one. I used a regular zip, so that made it look less professional. An invisible zip makes it look like there's just a seam rather than an obvious zip.
Secondly, I didn't run the actual zipper all the way to the top of the dress. Instead, I ran the fabric edges of the zip up to the top of the dress. This creates about a 3/4" gap between the top of the dress and the place where the tabbed pull of the zip actually stops.
To fix this, you should always cut (or fold down) that top of the fabric part of the zip to within about 1/4" of the place where the tabbed pull of the zip stops. This way, you can put a hook and eye at the top of the dress as a finishing touch, and there won't be any noticeable gap between the top of the zip and the top of the dress.
You know, if you're going to take the time and energy to make a garment, you should take the time and energy to make it look as professional as possible. You don't want your stuff to look homemade.
I hope these two tips help you in future projects --
xoxox
Monday, August 10, 2009
All-Nighter
But enough about how sleepy I am. Who cares anyway? Look what I got done!
So we found some fabric at JoAnns that she liked better than the buffalo-checked gingham, and here's what we ended up with --
- jeans that will need to be narrowed into skinny jeans
- a couple of skirts for me
- several tops
- a very cute denim jacket
- 4 juice glasses
- 3 coffee cups (we're always breaking and chipping them)
- 8 movies on VCR
- "The 4-Hour Work Week" in hardback
- a gorgeous glass cookie jar (I'll use it for pasta because it's tall)
- and these --
Bass classic khakis that were WAY too short -- but I didn't care, because I bought them to cut off to capri length! Rose has absconded with my favourite khaki capris so I needed a new pair. Ah, the consequences of teenage daughters! Last night I hemmed them up with a nice little vent at the outside.
Finally, I decided to throw an apron in just for fun -- I'd like to try to make one or two every week to stock my Etsy shop. I design as I go, which means this took up most of the night.
+ a Waverly valance I found at a garage sale =
Extra-long ties wrapped to the front,
or wrapped to the back.
(couldn't get a decent photo of the one with the rosette)
At first, I thought I'd do a solid border on the hem. But then I did a rough sketch, and decided on the scallops.
They were easy: I just folded the apron in half, and kept doing that until I had the width for the scallops that I wanted. I counted the folds, and I had 8.
Then I cut 16 pieces that same width, and rounded the bottoms using a nearby CD-ROM.
I sewed each one right sides together, and flipped them inside out, leaving the top edge open.
Then I laid them out along the hem of the apron, and when I had what I wanted, I pinned them on and stitched them down.
There was nothing on TV, so I sat with my laptop and played YouTube clips. Trudy from HotPatterns would have been proud -- it was the all-Trudy channel, all night! LOL!
Actually, that was useful because it inspired the rosette on one of the pockets. I tried a spiderweb rosette, but it really didn't work with the woven fabric. So I just took a long strip, gathered the edge, and coiled it around, hand sewing it down as I went.
For the other pocket, I had some leftover bias trim from the valance, so I made the little loop for a dishtowel. I covered the top with an old button, then glued another button on top of that.
When I cut this apron, I extended the top a bit and rounded it off so it would fit a little above the waist. And I made the ties extra long to accomodate every waist. I like it. I think it's a fresh look to an old 80's fabric. What do you think?
Going to sleep now -- starting to zone out!
xoxox